My Journey Running AI Locally: Is It Worth It?
So you’re thinking about running AI locally? Welcome to the club! After spending many hours tinkering with different models, dealing with mysterious errors, and watching my laptop fan work overtime, I’ve learned a thing or two. Let me share my journey to local AI freedom.
Why Go Local Anyway?
Before we dive into the technical deep end, let’s talk about why anyone would choose to code with local AI when Claude Code offers great capabilities in the cloud.
Remember when API calls were cheap? Yeah, those days are getting blurrier in the rearview mirror. If you’re using AI heavily for coding, writing, or experimentation, those costs add up faster than you can say “context window”. The latest frontier models are almost exclusively closed-source and only available via API, which means you’re at the mercy of rate limits, rising costs, and potential privacy concerns. Running AI locally gives you:
- No more API bills
- Full control over your data
- Instant access without internet dependency
Here’s the kicker: open-weight models are typically about 9 months behind their closed-source cousins. But you know what? Nine months ago, frontier models were still pretty darn good. And if this trend continues, in 9 months we might be running Opus-class models on consumer hardware. Now that’s exciting! Of course you need some serious hardware to pull it off. But even on more modest setups, you can still do a lot. Let’s see what we can do with the models available today.
My Setup: The Hardware
I’m running all this on an M4 Pro with 48GB of unified RAM. Is it overkill for casual browsing? Absolutely. Is it perfect for AI experimentation? Heck yes!
The unified memory architecture is a game-changer. The GPU and CPU share the same memory pool, which means you can load larger models than you’d expect. But even without unified memory, you can still fairly capable smaller models on a traditional setup. How? Read on!
AI Terminology 101
When I first started, I had to download a model and was confused by the naming conventions. For example, what’s the difference between “Qwen3.6-35B-A3B” and “Qwen3.6-27B”? What does A3B mean? And what is the difference between 4-bit and 8-bit quantization? Let’s break it down.
Full Weight vs. Active Parameters
Think of a model’s full weight as its total thinking capacity. Active parameters, on the other hand, are what’s actually being used during inference. Some models use mixture-of-experts (MoE) architecture, where only a subset of parameters activate for each request. It’s like only a portion of the brain lighting up for certain tasks. This can lead to faster inference and lower memory usage, but it also means that the model might not utilize its full potential for every request. For example, Qwen3.6-35B-A3B has 35 billion parameters in total, but only 3 billion are active at any given time. This can make it faster and more efficient, but it also means that the model’s performance can vary depending on the task. It is less knowledgeable than its 27B full weight sibling, which has all 27 billion parameters active.
Quantization: 4-bit vs. 8-bit
Quantization is basically compression for AI models. Instead of storing each parameter’s full 16-bit precision (think: storing “3.14159265359” vs just “3.14”), you reduce the precision to save memory.
- 8-bit quantization: Better quality, needs more RAM
- 4-bit quantization: More compressed, faster, but slightly lower quality
The quality difference is often negligible for everyday tasks, making 4-bit a sweet spot for consumer hardware. For example, a 35B parameter model might be around 84GB in full precision, but with 4-bit quantization, it can drop to around 18GB. This makes it feasible to run on consumer hardware like my M4 Pro. Just keep in mind that the more you quantize, the more you might lose in terms of nuance and accuracy, especially for complex tasks. With 4-bit quantization, you might see a 5% drop in performance on certain tasks, but for general coding assistance, it’s often more than good enough.
MLX vs. GGUF
These are different formats/frameworks for running models:
- MLX: Apple’s framework optimized for Apple Silicon, taking full advantage of unified memory. If you’re on a Mac, you can expect over 2x speedup compared to GGUF.
- GGUF: Cross-platform format that works everywhere (think: the MP3 of AI models)
The Tools of the Trade
I’ve tested a few runners for local inference. Here’s how they stack up:
| Tool | Pros | Cons | Best For |
|---|---|---|---|
| LM Studio | Beautiful UX, HuggingFace model browser, JIT loading | Some MLX compatibility issues | General use, beginners |
| Ollama | Simple CLI, great for automation, solid stability | Limited model format support | Scripts, automation |
| Llama.cpp | Maximum control, bleeding edge features | Steeper learning curve | Power users |
| MLX Server | Native Apple Silicon optimization through CLI | Apple-only, smaller ecosystem | Maximum performance on Mac |
| oMLX | Open-source MLX implementation with heavy caching | Still in early stages, some stability issues | Open-source enthusiasts |
Ollama
I first tried Ollama because of its simplicity and good reputation. It was pretty easy to set up and worked decently for basic tasks. However, I didn’t find it very user-friendly for managing multiple models or switching between them.
My Favorite: LM Studio
I keep coming back to LM Studio because it just works. The UI is clean and intuitive, downloading models from HuggingFace is a breeze, and the just-in-time model loading means the model only spins up when I actually need it.
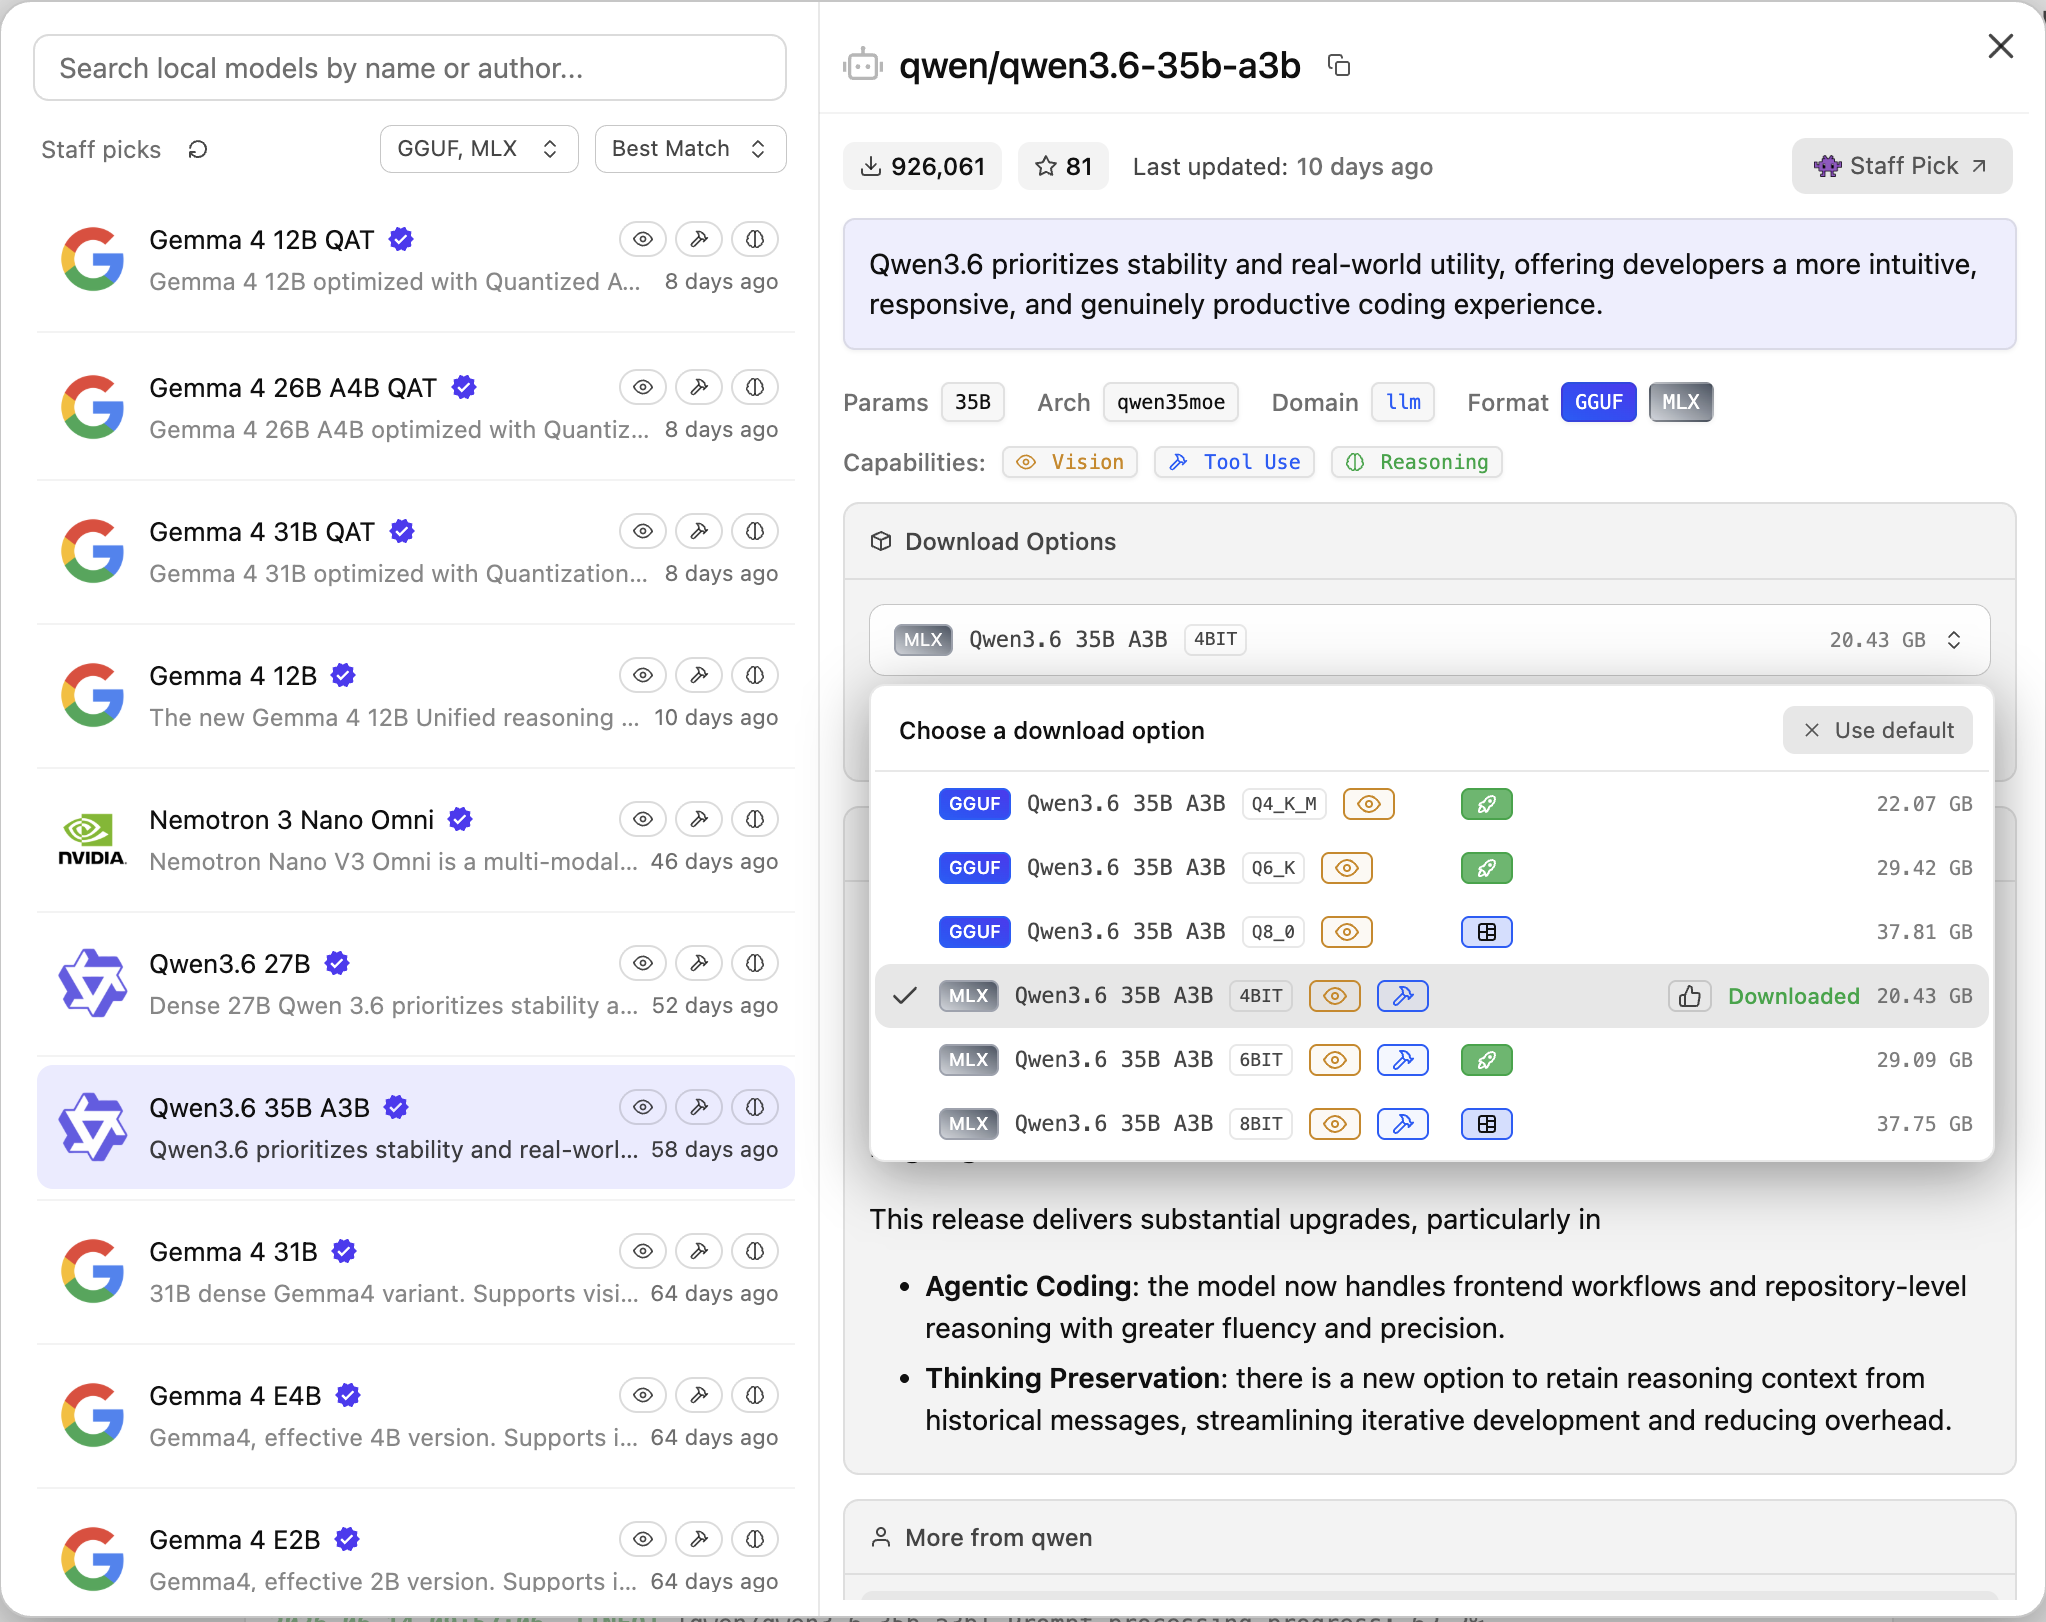 LM Studio’s clean interface makes model management actually enjoyable
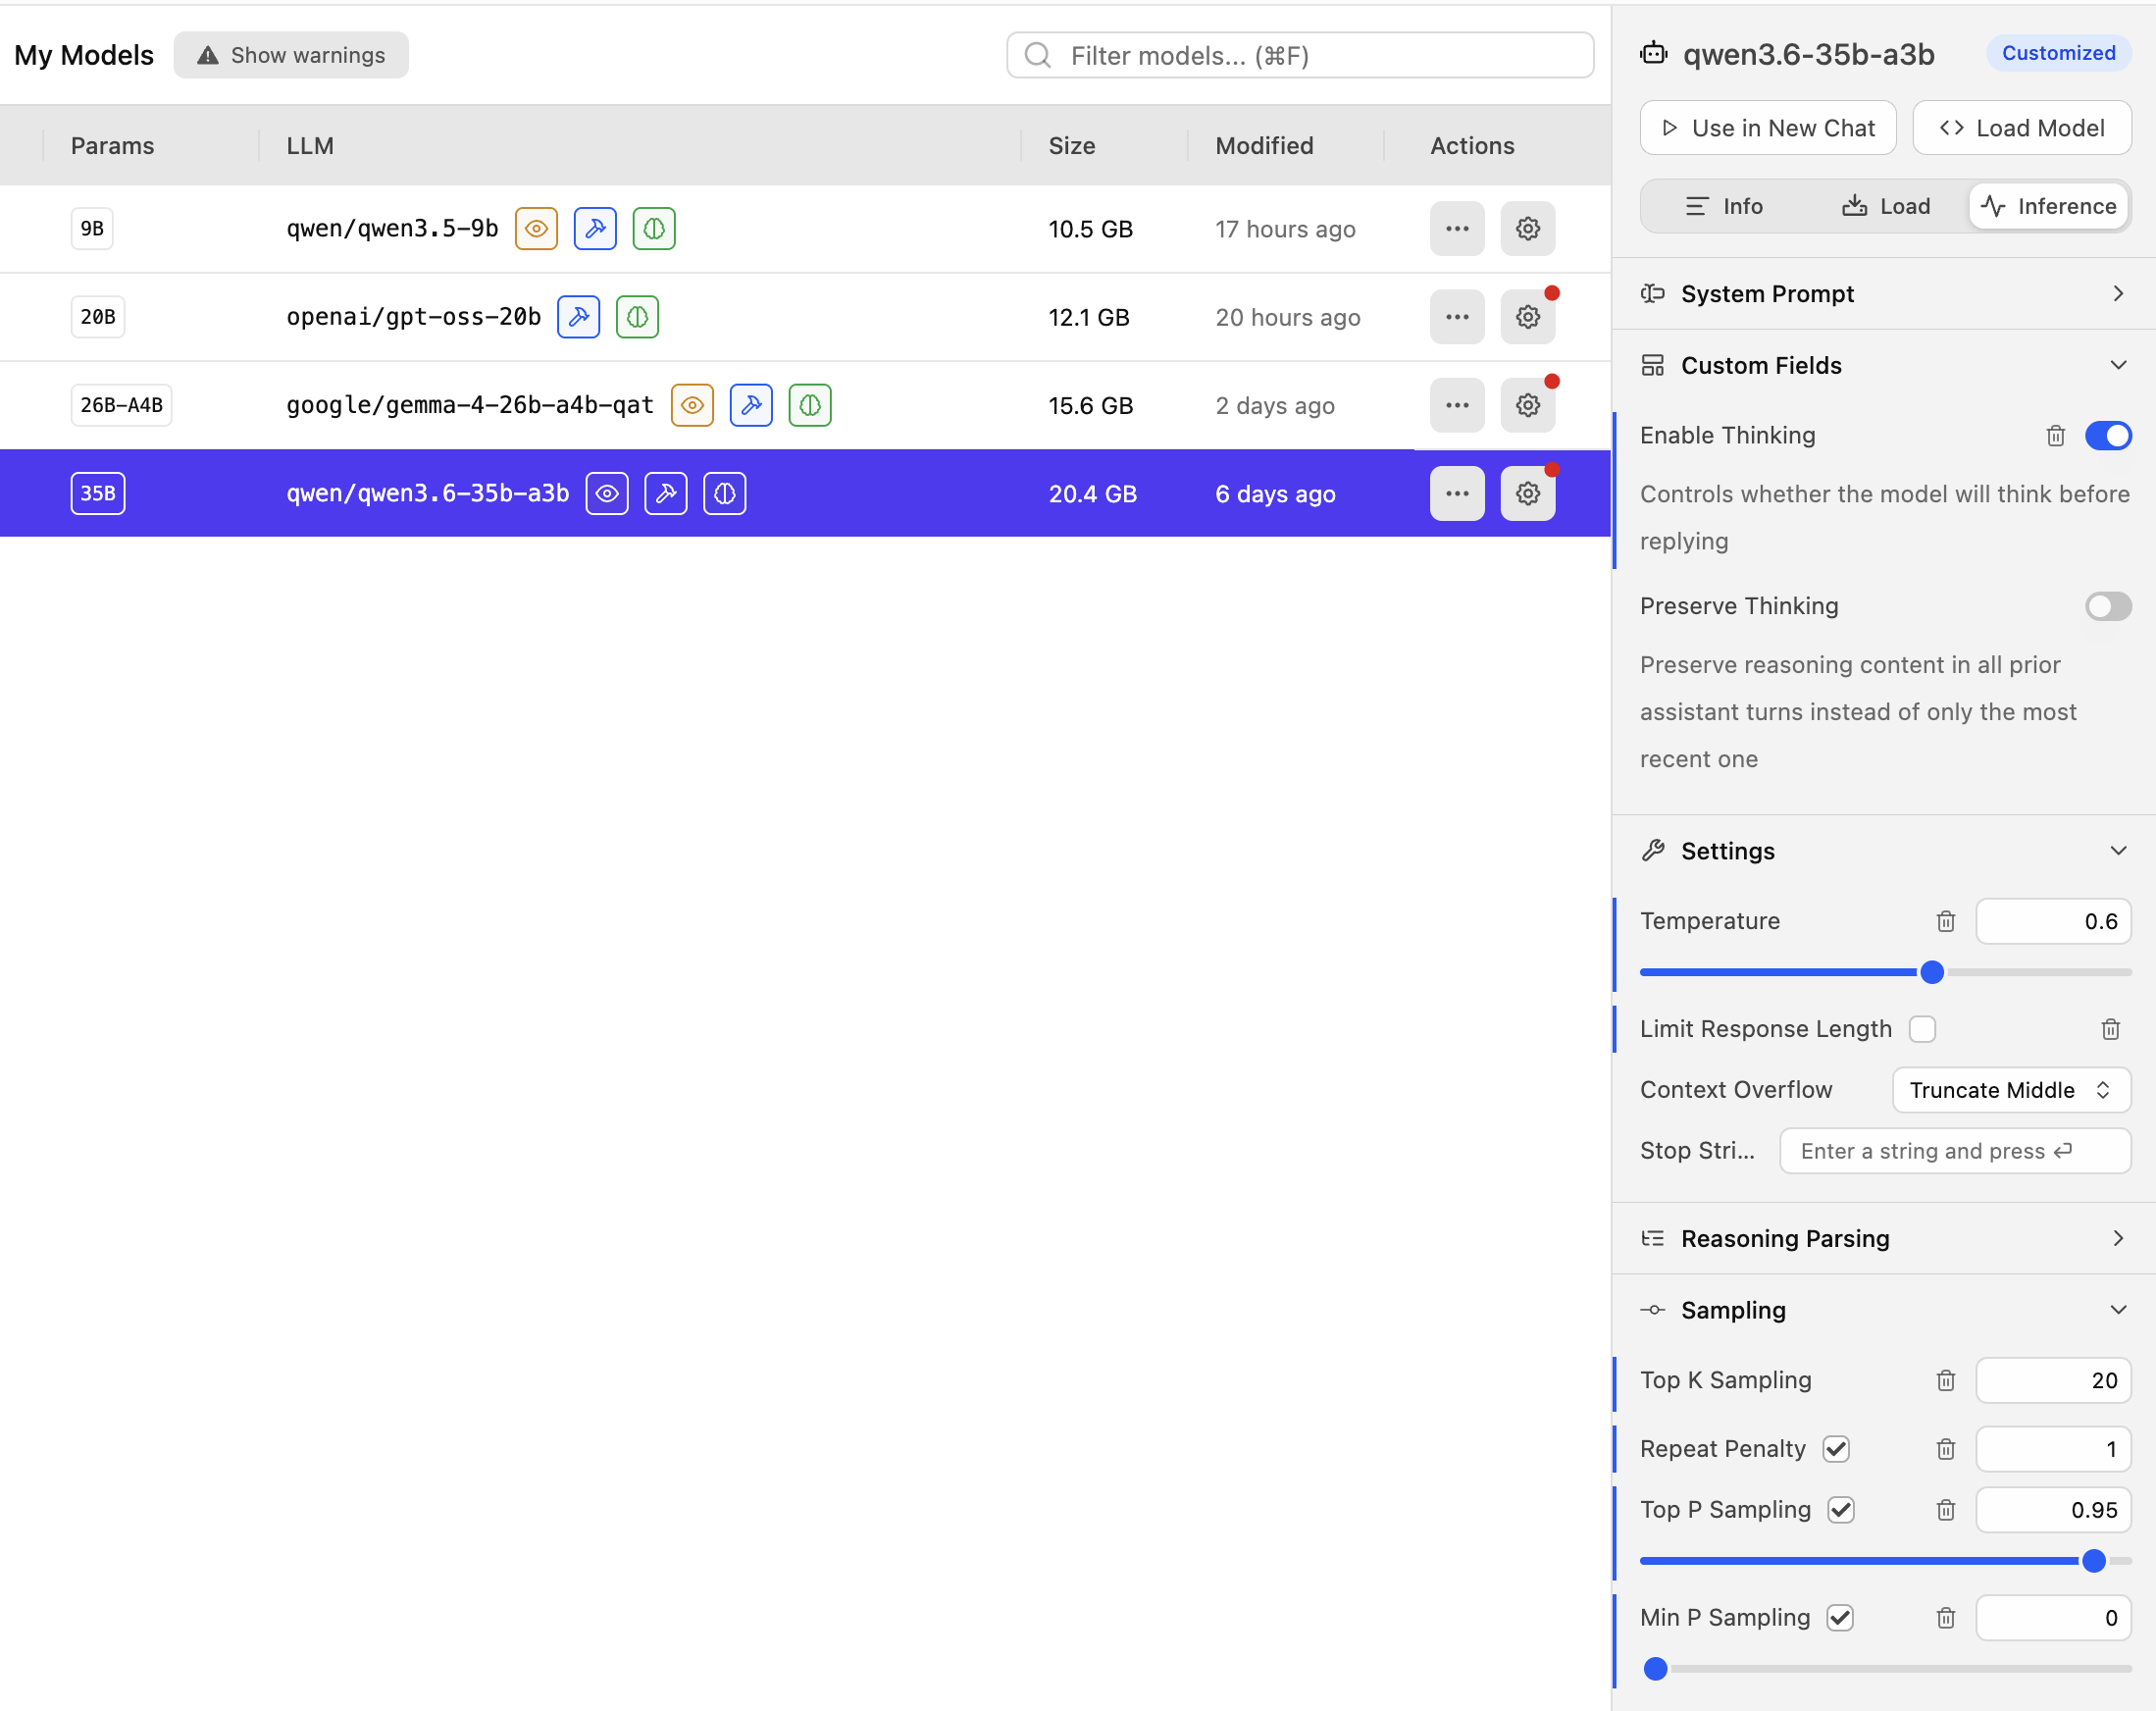 It’s easy to see which models you have, their sizes, configure and manage them
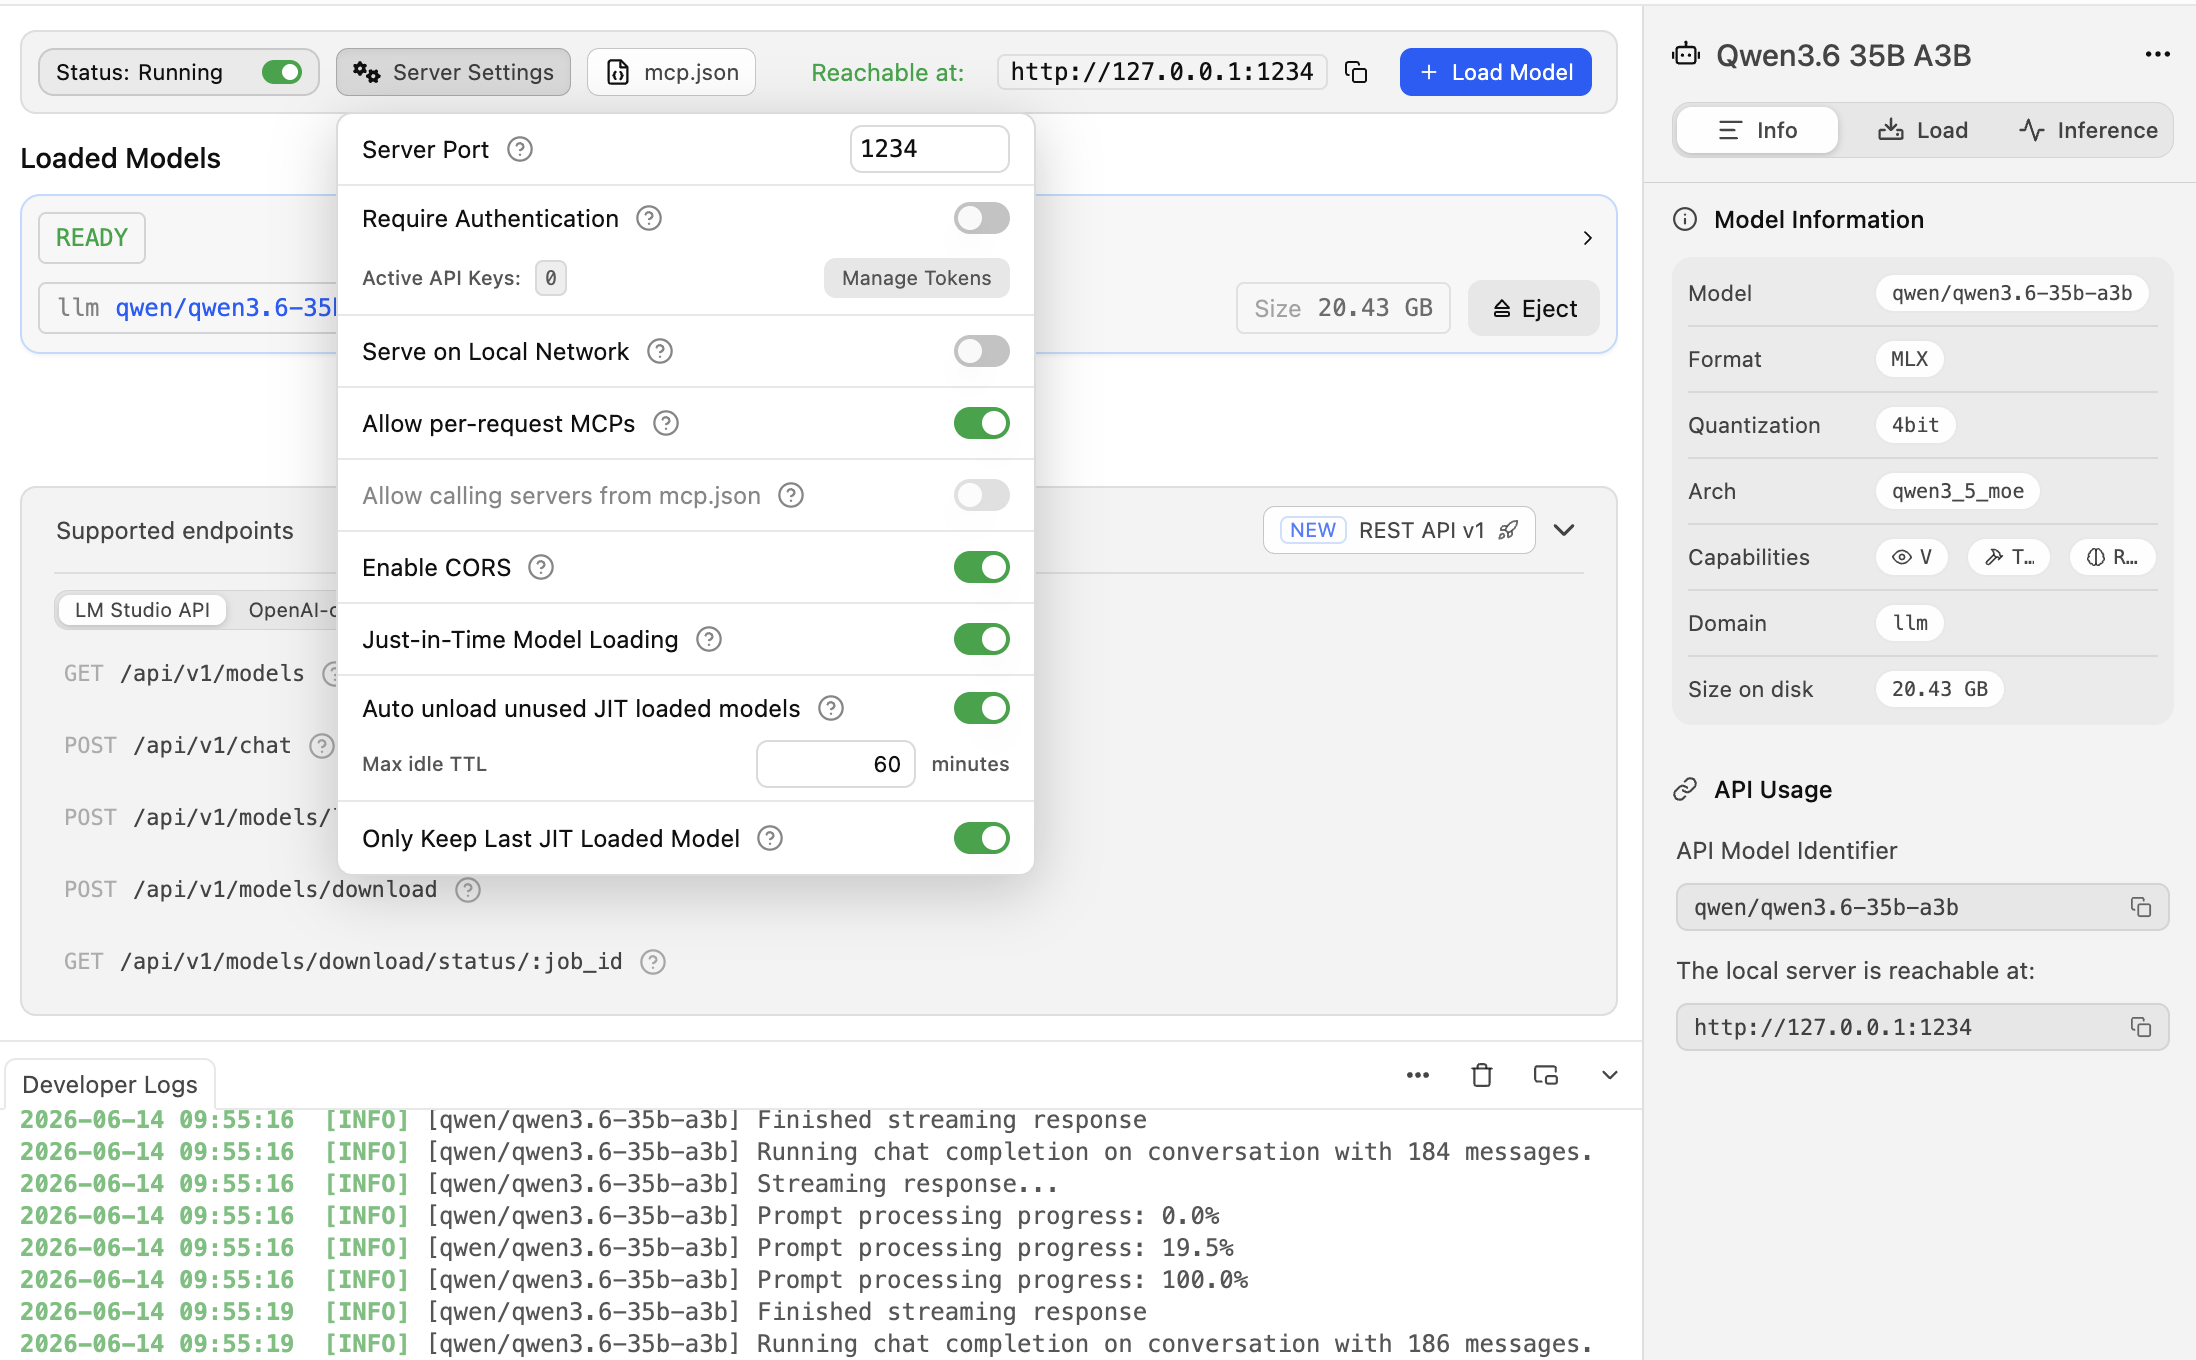 The server tab shows you which model is active and lets you configure JIT settings like idle timeout
If you want a hassle-free experience with local AI, LM Studio is the way to go. It has some MLX compatibility issues, but the developers are actively working on it, and it’s still the most user-friendly option for managing local models.
oMLX
I also tried oMLX, an open-source implementation of MLX. It’s promising even greater performance than standard MLX by using heavy caching. However, it’s still in the early stages and I missed some of the features in LM Studio, like the HuggingFace model browser and JIT loading. If you’re really into performance optimization and don’t mind the wonky UX, it’s worth giving oMLX a try.
Battle of the Models
I put several models through their paces for real coding work. Here’s the roster:
| Model | Parameters | Download Size | Speed (tok/s) | Vision | Verdict |
|---|---|---|---|---|---|
| Qwen3.6-35B-A3B | 32B (3B active) | ~20GB (4-bit) | ~78 | ✅ Yes | ⭐⭐⭐⭐⭐ Fast and capable, but prone to thinking loops |
| Qwen3.6-27B | 27B full | ~16GB (4-bit) | ~10 | ✅ Yes | ⭐⭐ Capable but too slow |
| Qwen3.5-9B | 9B full | ~10GB (4-bit) | ~27 | ✅ Yes | ⭐⭐ Not very capable, and slow |
| Gemma-4-27B-A4B | 27B (4B active) | ~16GB (4-bit) | ~72 | ✅ Yes | ⭐⭐⭐ Fast, but tool issues with MLX |
| Gemma-4-31B | 31B full | ~18GB (4-bit) | ~8 | ✅ Yes | ⭐⭐ Too slow, no MLX support (yet) |
| GPT-OSS-20B | 20B (less active) | ~12GB (4-bit) | ~70 | ❌ No | ⭐⭐⭐⭐ Surprisingly capable, but small context window |
Note that these speeds were measured on my M4 Pro with 48GB of RAM using MLX optimization. Your mileage may vary based on your hardware.
Honorable Mention: GPT-OSS-20B
For an older model of this size, GPT-OSS-20B punched way above its weight class. However, the lack of vision capabilities and a smaller context window made it less ideal for coding tasks that require understanding of screenshots or larger codebases.
The Tortoises: Full Weight Models
Both Qwen3.6-27B and Gemma-4-31B were painfully slow on my hardware, even with MLX optimization. At ~10 tokens per second, you could make a coffee while waiting for a response. It takes minutes to even process the system prompt, so you will not see a response until much later. I even saw timeouts in Copilot. Not ideal for interactive coding. Even a smaller full weight model like Qwen3.5-9B was fairly slow.
The Fast and Capable: Qwen3.6-35B-A3B
Qwen3.6-35B-A3B with its MoE architecture was blazingly fast! It feels just as fast as running a cloud hosted model. It’s vision capabilities are decent and it had excellent tool-calling capabilities. I was able to generate this whole blog website with it without writing a single line of code myself. This is definitely my favorite model for my hardware right now.
The Agent Framework
I also experimented with different local AI coding agent frameworks:
- GitHub Copilot (via OAICopilot plugin): My daily driver
- Continue: Most recommended online. Good for simple tasks, but lacks advanced features
- Kilo Code: Like Continue but with more features and a cleaner interface
- OpenCode: Open-source alternative to Claude Code, with a native MacOS app
- Claude Code: Supports local models, but I prefer Open Code because it is open-source.
I started with GitHub Copilot since it’s what I’m used to. My initial thoughts? With the right model and MLX optimization, it worked pretty well. I asked it to generate this blog website, and it did a decent job. Or so it seemed… First, let’s see how I got local AI working with Copilot.
The setup:
- Install OAICopilot plugin in VS Code
- Configure a provider (e.g., Ollama or LM Studio) through the OAICopilot settings in VS Code.
- Add a model, when you have selected the provider, it will fetch the models available in that provider, and you can select the one you want to use. For example, if you have LM Studio set up with Qwen3.6-35B-A3B, you would select that model from the list.
- The model didn’t show up in the model selector at first. But after pinning the model in the managed models section in the Chat window, it was selectable.
That’s it! Copilot will now use your local model in the chat. It’s a bit of a setup process, but once it’s running, it’s pretty seamless.
One thing I noticed was that whenever I started a new prompt, the model would take a moment to “warm up” before generating an initial response. This is because Copilot sends a large system prompt to the model to set the context for the coding task. The model needs to process this system prompt before it can generate a response, which can take a few seconds, especially with larger models. Once the initial response is generated, subsequent interactions are much faster since the model is already “warmed up” and has the context in memory. This is something to keep in mind when using local models with Copilot. You might experience a slight delay on the first response, but it should speed up after that.
After some initial successes, I did notice that some models, but mainly Gemma-4, struggled with tool-calling. They often failed to execute a prompt in the terminal or modify a file. At first I thought it was an issue with the model, but it turned out to be a combination of the model’s capabilities and how Copilot interacts with it. Some models just aren’t as good at understanding when to call tools or how to structure their responses for tool-calling. This is a crucial aspect of the agent experience, and it’s something to keep in mind when choosing a model for local AI. However, with all models I had some issues with tool calling. So I figured it might be more an issue with Copilot’s implementation of tool calling rather than the models themselves. I hope future updates to Copilot will improve this aspect, especially for local models.
Another issue I encountered was that some models would get stuck in “thinking loops” where they would keep generating output without actually producing a useful response. This was particularly common with MoE models like Qwen3.6-35B-A3B. It seems that when the model encounters a situation it doesn’t know how to handle, it can get stuck in a loop of generating output without making progress. Adjusting the temperature and repetition penalty settings helped mitigate this issue, but it was still a frustrating experience at times.

Finally, I encountered so many issues with tool calling that the retry button in Copilot became a frequent sight. At that point, I realized I needed to try some other tools to see if Copilot was the issue.
Open Code
After I tried some vscode extensions for other agents like Kilo Code and Continue, I found that Open Code was the most reliable for local models. It has a native MacOS app, which makes it feel more integrated into the system. The tool-calling capabilities were much better than what I experienced with Copilot, and it handled local models more gracefully. I could finally get a workflow going where I could generate code, run it, and iterate without constantly hitting errors or getting stuck in loops. Open Code also doesn’t have the same integration level with VS Code as Copilot does, but it was still a solid experience overall. I was able to generate this whole blog website using Open Code with Qwen3.6-35B-A3B, and it only took a few prompts!
 Open Code running Qwen3.6-35B-A3B feels incredibly responsive and integrated.
With Open Code I didn’t experience any tool-calling issues or timeouts. The model was able to execute commands in the terminal and modify files as expected. It felt like a much more seamless experience compared to Copilot. Also, the system prompt is a lot smaller than Copilot’s, which contributes to faster initial response times. If you’re looking for a local AI agent framework that works well with local models, I would definitely recommend giving Open Code a try.
Hard-Won Lessons
After weeks of tinkering, here’s what I learned:
1. GitHub Copilot doesn’t work with local models.
Yes, in theory, you can use Copilot with local models. In practice, it often fails to call tools correctly. This happened with all models I tried, including Qwen3.6-35B-A3B and Gemma-4. Maybe future updates to Copilot will improve this, but for now, local models are a no-go for Copilot users. If you want to use local models, you’ll need to explore other agents or frameworks that are better suited for local inference.
2. Use the recommended settings for your model.
On the Hugging Face model page, you’ll often find recommended settings for temperature, repetition penalty, and other parameters. These are there for a reason. Models can behave unpredictably if you stray too far from the recommended settings. For example, I found that Qwen3.6-35B-A3B recommends a temperature of 0.6 and a repetition penalty of 1.0. Deviating from these settings led to more frequent thinking loops and less reliable output. They do recommend different settings for different use cases. Most models have these recommendations, so it’s worth taking the time to read through them and adjust your settings accordingly. It can make a big difference in the quality and reliability of the responses you get from the model.
3. Smaller Models Are Lazy
I’m used to agents that automatically verify their code changes by running builds and tests. Smaller models like Gemma-4 and GPT-OSS often skip verification unless you’re very explicit. You can’t assume they’ll do the smart thing, you need to spell it out.
4. MLX Optimization is a Game-Changer
If you’re on Apple Silicon, MLX optimization is a must. It can make a huge difference in speed and responsiveness. For example, Qwen3.6-35B-A3B ran at ~78 tokens per second with MLX optimization, but only ~30 tokens per second without it. That’s a 2.6x speedup! If you’re serious about running local AI on a Mac, MLX is the way to go.
5. Mind your RAM
Models can be memory hogs. Even with 48GB of unified RAM, I had to be careful about which models I loaded. If you run out of RAM, your system will start swapping to disk, which can lead to severe slowdowns and even crashes. My Mac crashed 2 times because I overstepped my memory usage. Keep an eye on your memory usage and be mindful of the models you have loaded at any given time. Also keep in mind that models use a base amount of RAM just to load, and then additional RAM for the context window. For example, Qwen3.6-35B-A3B uses around 20GB of RAM just to load, and then an additional 1-10GB for the context window, depending on the context length. If you try to have multiple conversations at once, your RAM usage can quickly exceed your available memory. Try to use only one session at a time and close any unused apps to free up memory. If you find yourself running out of RAM frequently, consider using a smaller model.
The Current Setup
In the end, I settled on a workflow that balances speed, capability, and reliability:
- LM Studio for model management and JIT loading of models
- Qwen3.6-35B-A3B for fast, capable responses, vision capabilities, and excellent tool-calling
- MLX optimization for maximum performance on my M4 Pro
- Open Code as the agent framework, since Copilot was unreliable with local models
Final Thoughts
Should you run AI locally on your MacBook? Like always, it depends.
If you’re a tinkerer who enjoys the challenge of setting up and optimizing models, you’ll find it rewarding. But if you just want a smooth, reliable experience, cloud-based solutions like Claude Code or Copilot are still the way to go.
Don’t expect miracles. After considerable tinkering, I got a workflow running. But it took trial and error, patience, and accepting that local models aren’t frontier models. You can expect to run into some frustrating moments. Models that are supposed to support tool-calling might not do it reliably. Some models will get stuck or your laptop might crash. It’s part of the journey.
The future is bright. If open-weight models continue tracking 9 months behind frontier models, we’ll soon have Sonnet or Opus-class models running locally. Of course, you’ll need serious hardware for that… Like DeepSeek v4 1.6T parameter models needing 900+ GB of VRAM! But the trajectory is clear. Thanks to quantization and better optimization, the hardware requirements are becoming more manageable.
Switching between tools. For now I’ll keep both Copilot and Open Code in my toolkit. Copilot is great for quick tasks and has better integration with VS Code, while Open Code is more reliable for local models. It’s nice to have options depending on the task at hand. I might consider switching to Open Code full-time if they continue improving their VS Code integration and add more features. But for now, having both gives me the best of both worlds.
What’s Next?
I’ll keep watching for new models and better tooling. The local AI space is evolving rapidly, and every month brings new possibilities.
Have you tried running AI locally? Leave a comment down below and share your experiences. I’d love to hear what’s working (or not working) for you!