My Journey Running AI Locally: oMLX saves the Day
After my experience with vLLM on NVIDIA hardware, I was painfully aware how behind Apple Silicon was in terms of software support. My 11 tokens per second on MacOS versus the 30 per second I saw on the NVIDIA rig was a stark reminder of the software gap I was dealing with. The memory bandwidth is exactly the same, so I should be getting more out of my hardware than I was.
A few months ago, I experimented with oMLX for running large language models locally. The project showed real promise. It had a sleek interface, great performance potential, and an ambitious roadmap. But it wasn’t ready for prime time. During my testing, it crashed my Mac several times, leaving me frustrated and reaching back to the more stable (but less performant) LM Studio.
I decided to discard it and move on. But recently, I gave it another shot, and I’m genuinely impressed by how far the project has come. What was once a promising but unstable experiment has matured into something I actually use every day now.
From Crash City to Stability
The transformation has been dramatic. The oMLX team clearly took stability seriously, implementing robust out-of-memory (OOM) safeguards that prevent the kind of system-crushing crashes I experienced before. Beyond that, there have been substantial performance and stability improvements across the board and the overall user experience has become much smoother and more reliable.
The Secret Sauce: Paged SSD KV Cache
oMLX doesn’t implement traditional PagedAttention like vLLM does, but they’ve built something very similar… A Paged SSD KV Cache system. Here’s how it works: oMLX maintains a two-tier memory hierarchy where hot context lives in fast unified memory while older, less-used KV cache blocks are intelligently spilled to SSD. When you reference a previous conversation prefix, oMLX restores the cached block from disk instead of recomputing it.
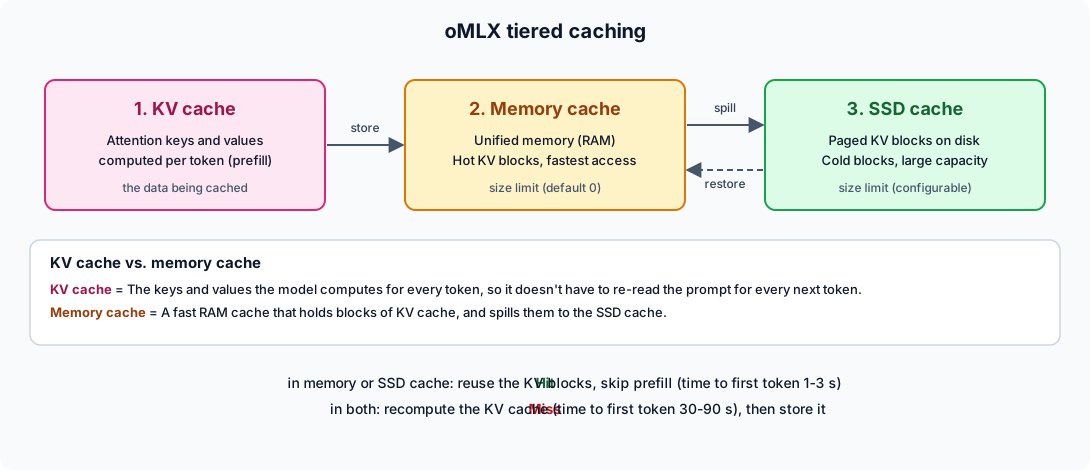
The real-world impact is staggering. Time to first token in long-context scenarios drops from 30+ seconds down to 1-3 seconds. On my M4 Pro, this is the difference between waiting out a bathroom break and getting an instant response. There’s also TurboQuant for optional 2-8 bit KV cache compression, which you can toggle in the Admin UI. This is another lever for squeezing out more performance and managing memory usage effectively.
Resource Management
Just like months ago I still noticed that memory usage spiked significantly during heavy workloads. It would drop from a relatively stable peak to the baseline in a matter of seconds, which would lead to temporary slowdowns. Then the memory usage would spike again as new data was loaded into the cache.

However, I found out that there is a setting to prevent just that! The two tiered caching system allows you to set limits for both in-memory and SSD caching, ensuring that memory usage remains under control even during heavy workloads. By default, the in-memory cache limit is set to 0. Which means the kv-cache is removed as soon as it is no longer needed. But is then immediately reloaded from the SSD cache if required again, causing the memory spikes I observed. Setting the in-memory cache to a higher value helps mitigate these spikes by keeping frequently accessed data readily available in memory, reducing the need to constantly reload from the SSD cache.
It also helps improve overall responsiveness, as the kv-cache can be accessed more quickly from memory rather than constantly being reloaded from the SSD cache.
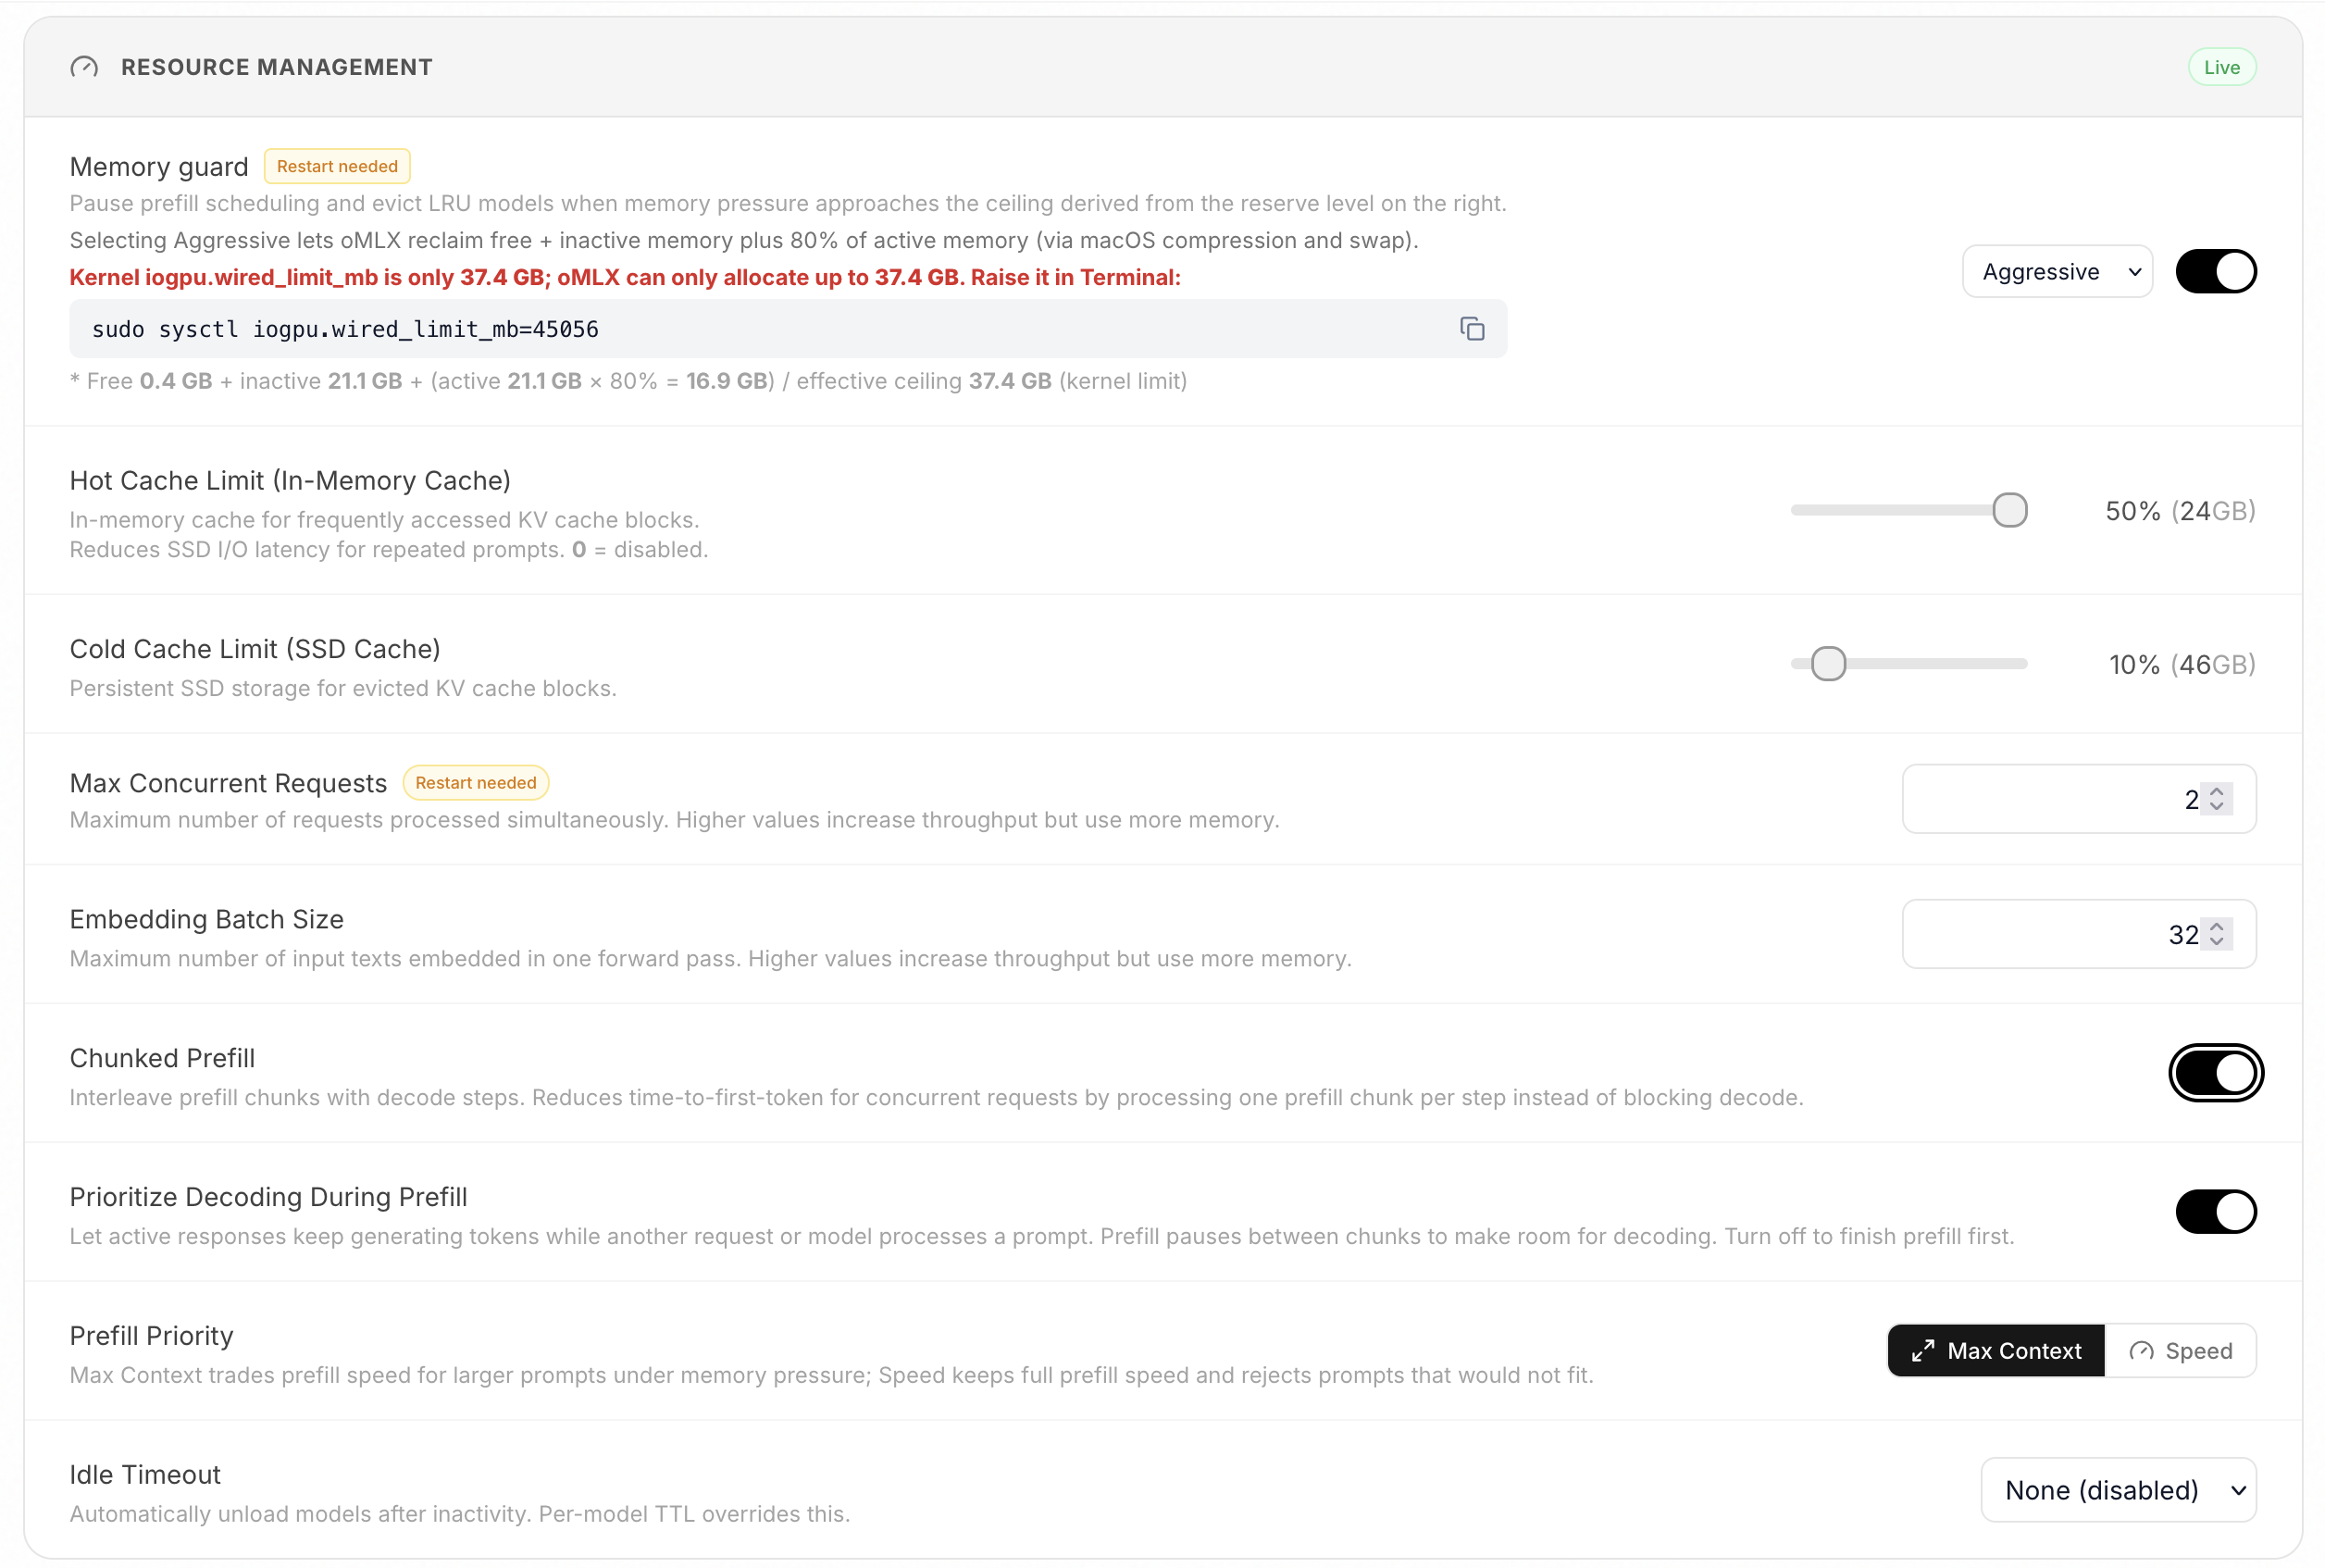
Also note that setting the SSD cache size appropriately is equally important. If the SSD cache is too small, frequently accessed data may be evicted prematurely, leading to more frequent reloads from slower storage and potentially negating the benefits of the in-memory cache. Balancing both in-memory and SSD cache sizes according to your workload and available resources is key to achieving optimal performance and stability.
Keep in mind that oMLX writes to your SSD constantly. To prevent excessive wear on your internal SSD, consider using an external SSD for caching if possible, or ensure that your internal SSD has sufficient endurance for the expected workload. If you plan to run your Mac as a long-term local AI workstation, investing in a high-endurance external SSD is highly recommended. It would be a shame if your Mac’s internal SSD wore out prematurely due to heavy caching operations.
Performance That Actually Reaches the Finish Line
The real win is in the numbers. I’m running Qwen 3.8-27B with Multi-Token Prediction (MTP) and prefix-caching enabled, and I’m consistently hitting 22 tokens per second. But here’s the kicker: on long conversations with massive context windows, the prefill no longer takes minutes. The prefix-caching ensures that repeated context is handled intelligently, meaning I’m not waiting around for the model to process the same tokens over and over.
This is the kind of practical, day-to-day improvement that makes local AI actually viable.
Beyond Raw Performance: The Whole Package
What pushes oMLX from “good enough” to “actually great” is attention to the user experience. A few standout features:
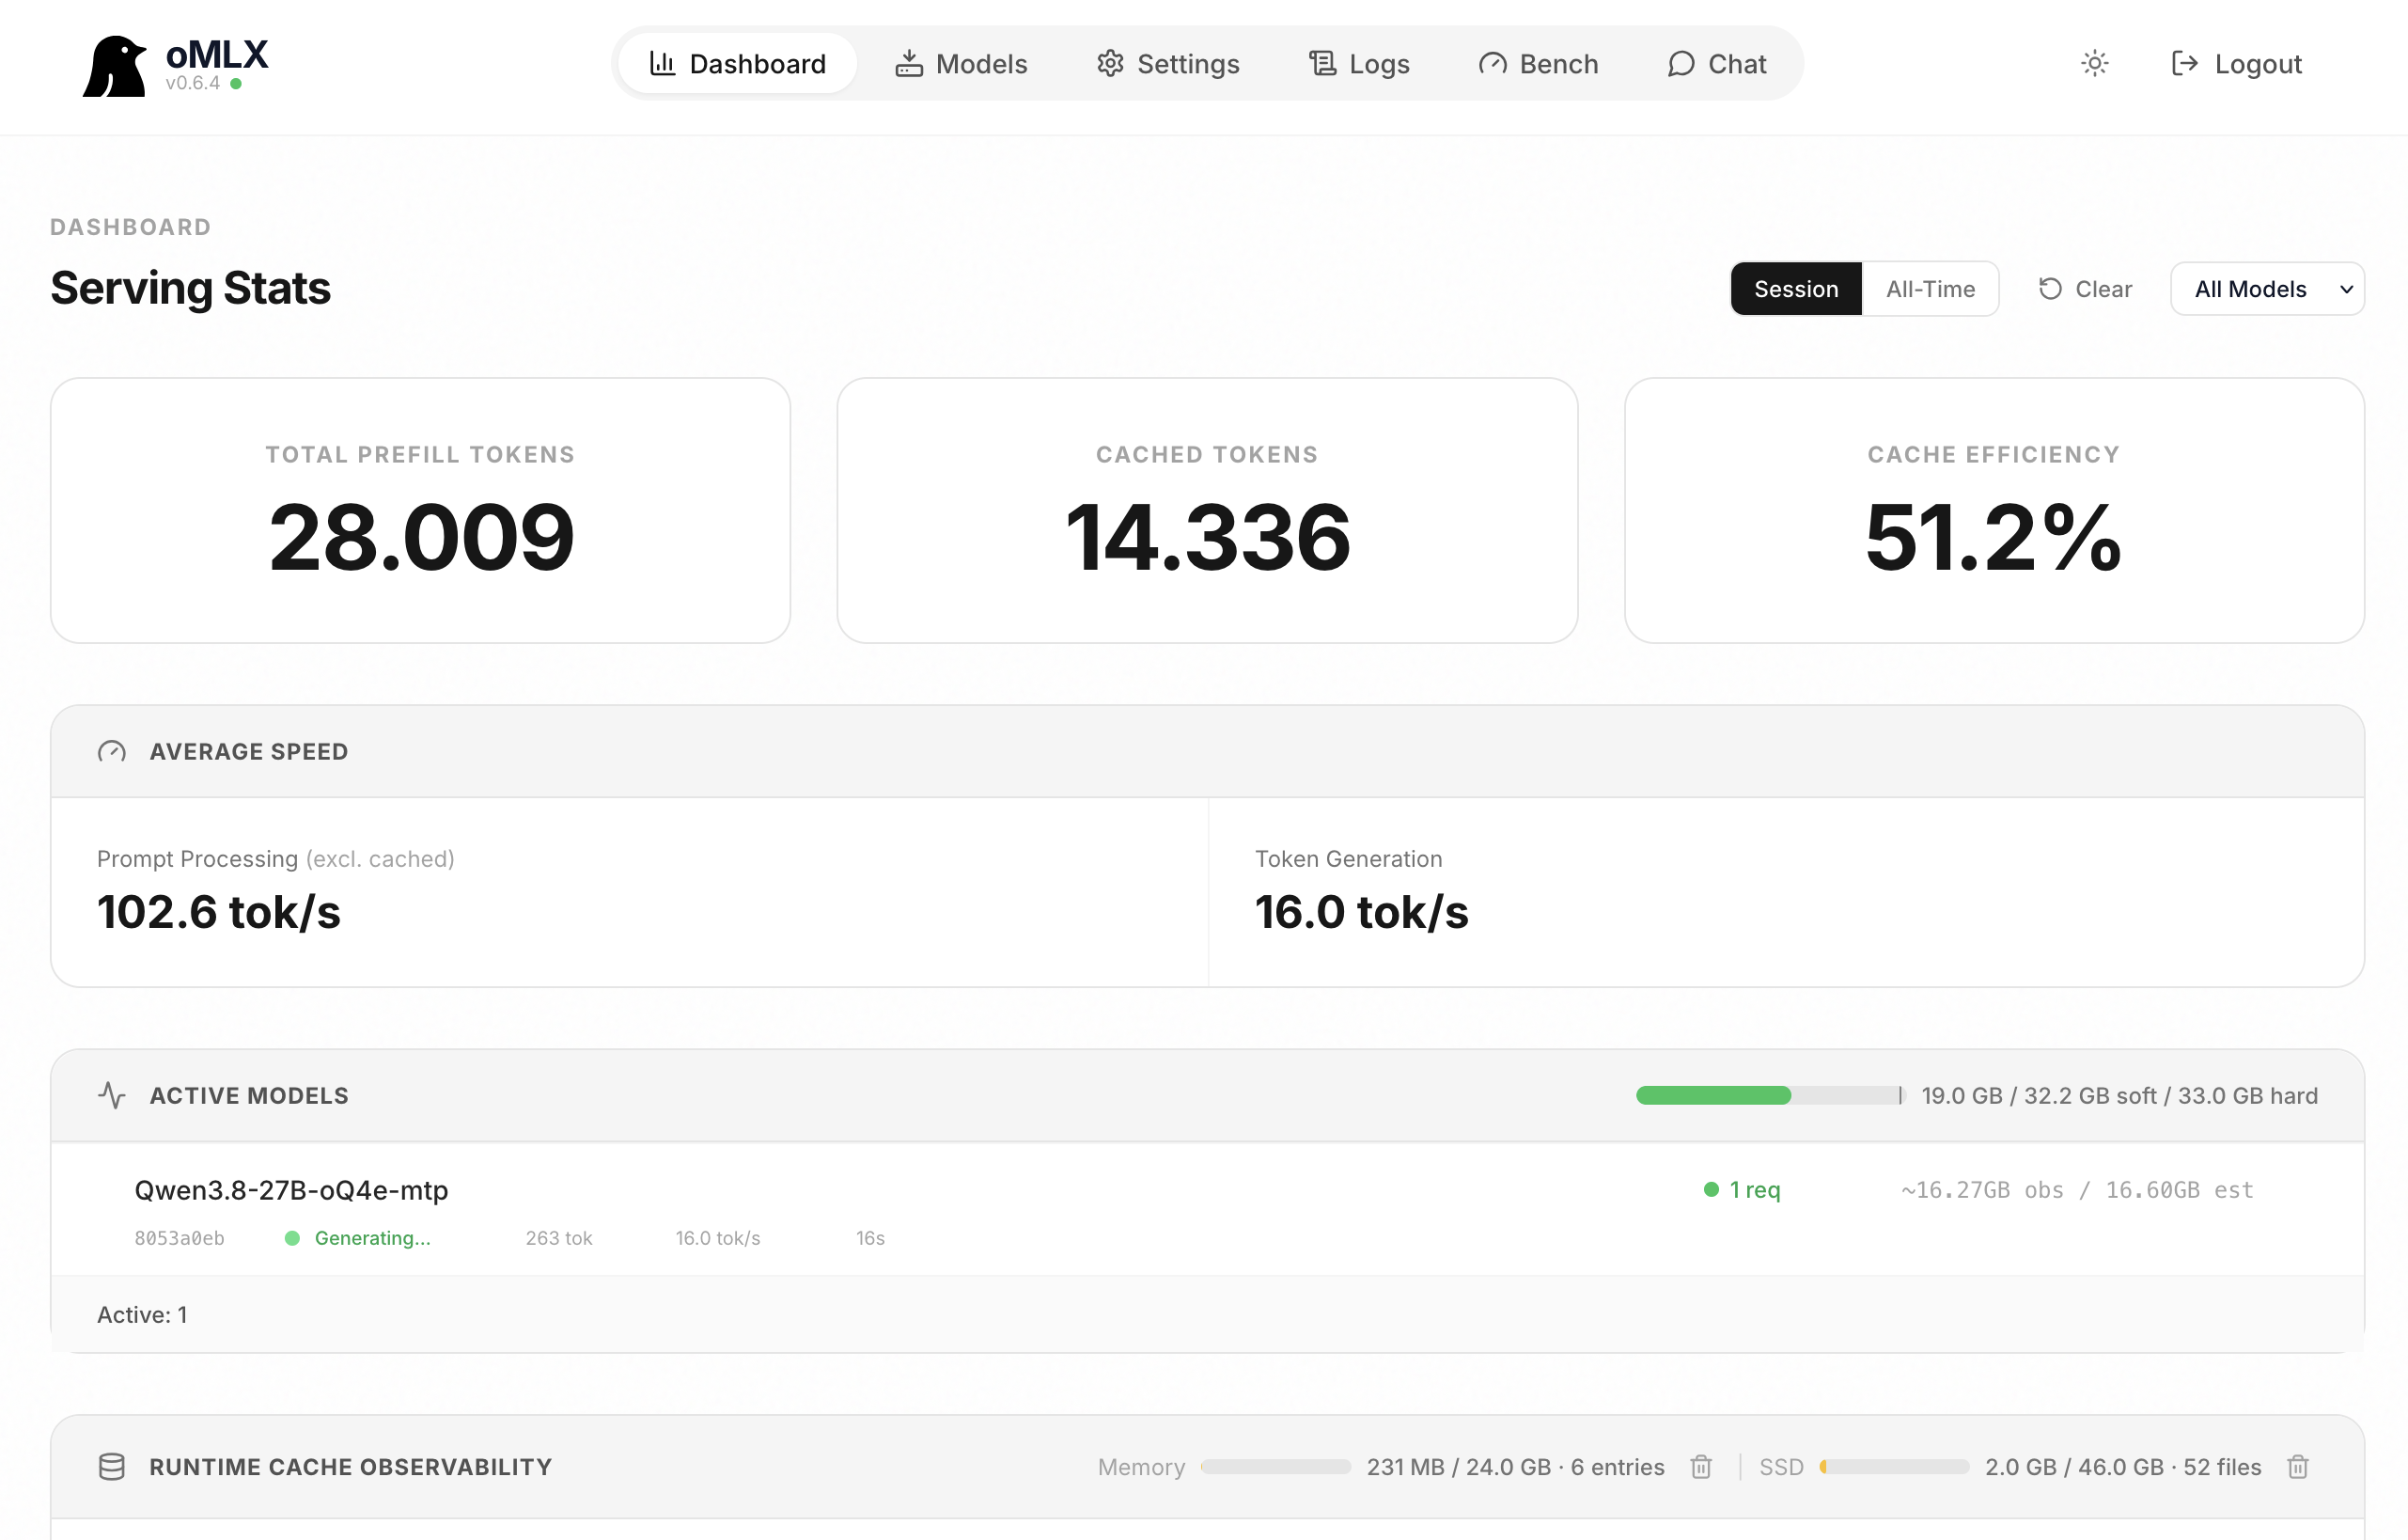
Dashboard: The included dashboard gives real-time visibility into what’s happening under the hood. You can see token throughput, memory usage, temperature, ssd cache size, and more. There’s also a straightforward interface for managing which models you have downloaded, adjusting inference settings, and monitoring system health. It’s the kind of visibility that lets you actually optimize your setup rather than guessing.
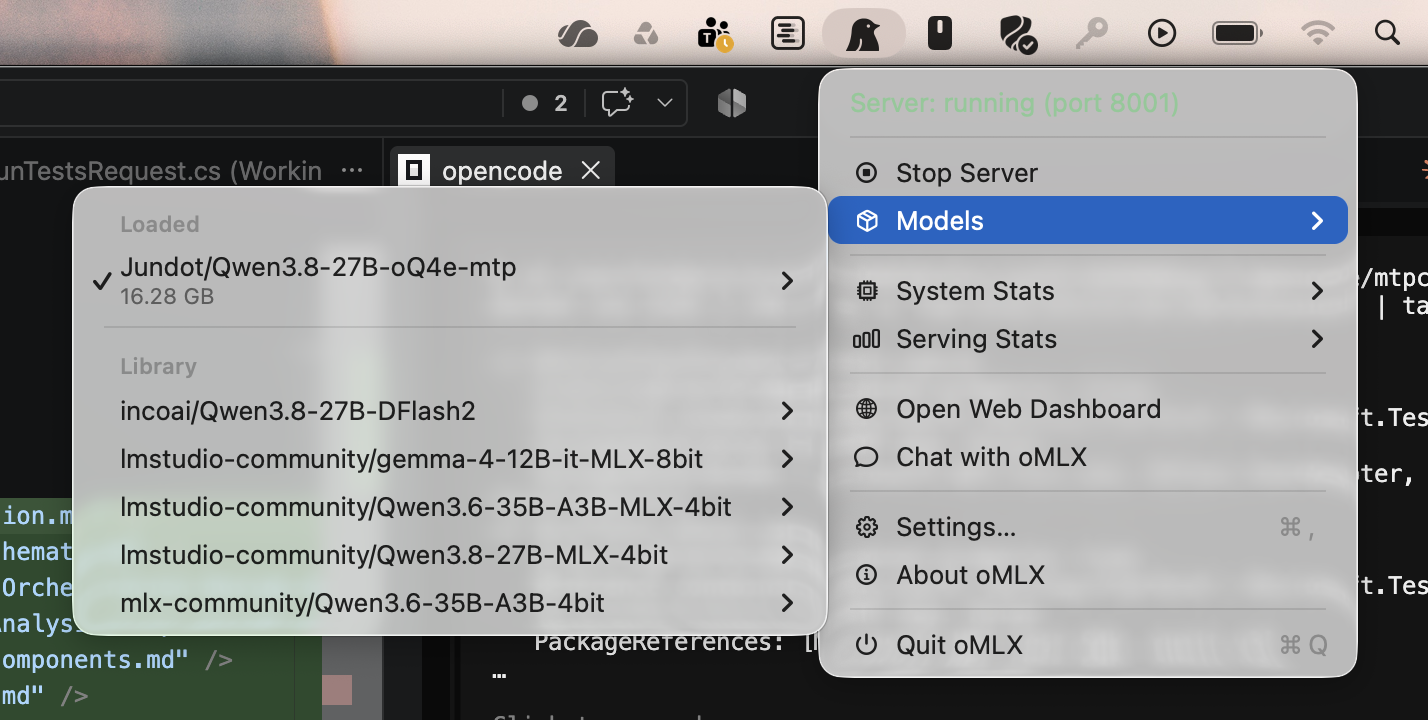
Status Bar Menu: oMLX lives in your Mac’s menu bar with a quick-access interface for loading, unloading, and switching models. It’s small but powerful. All the essential controls are just a click away, making it easy to manage your local AI setup without interrupting your workflow.
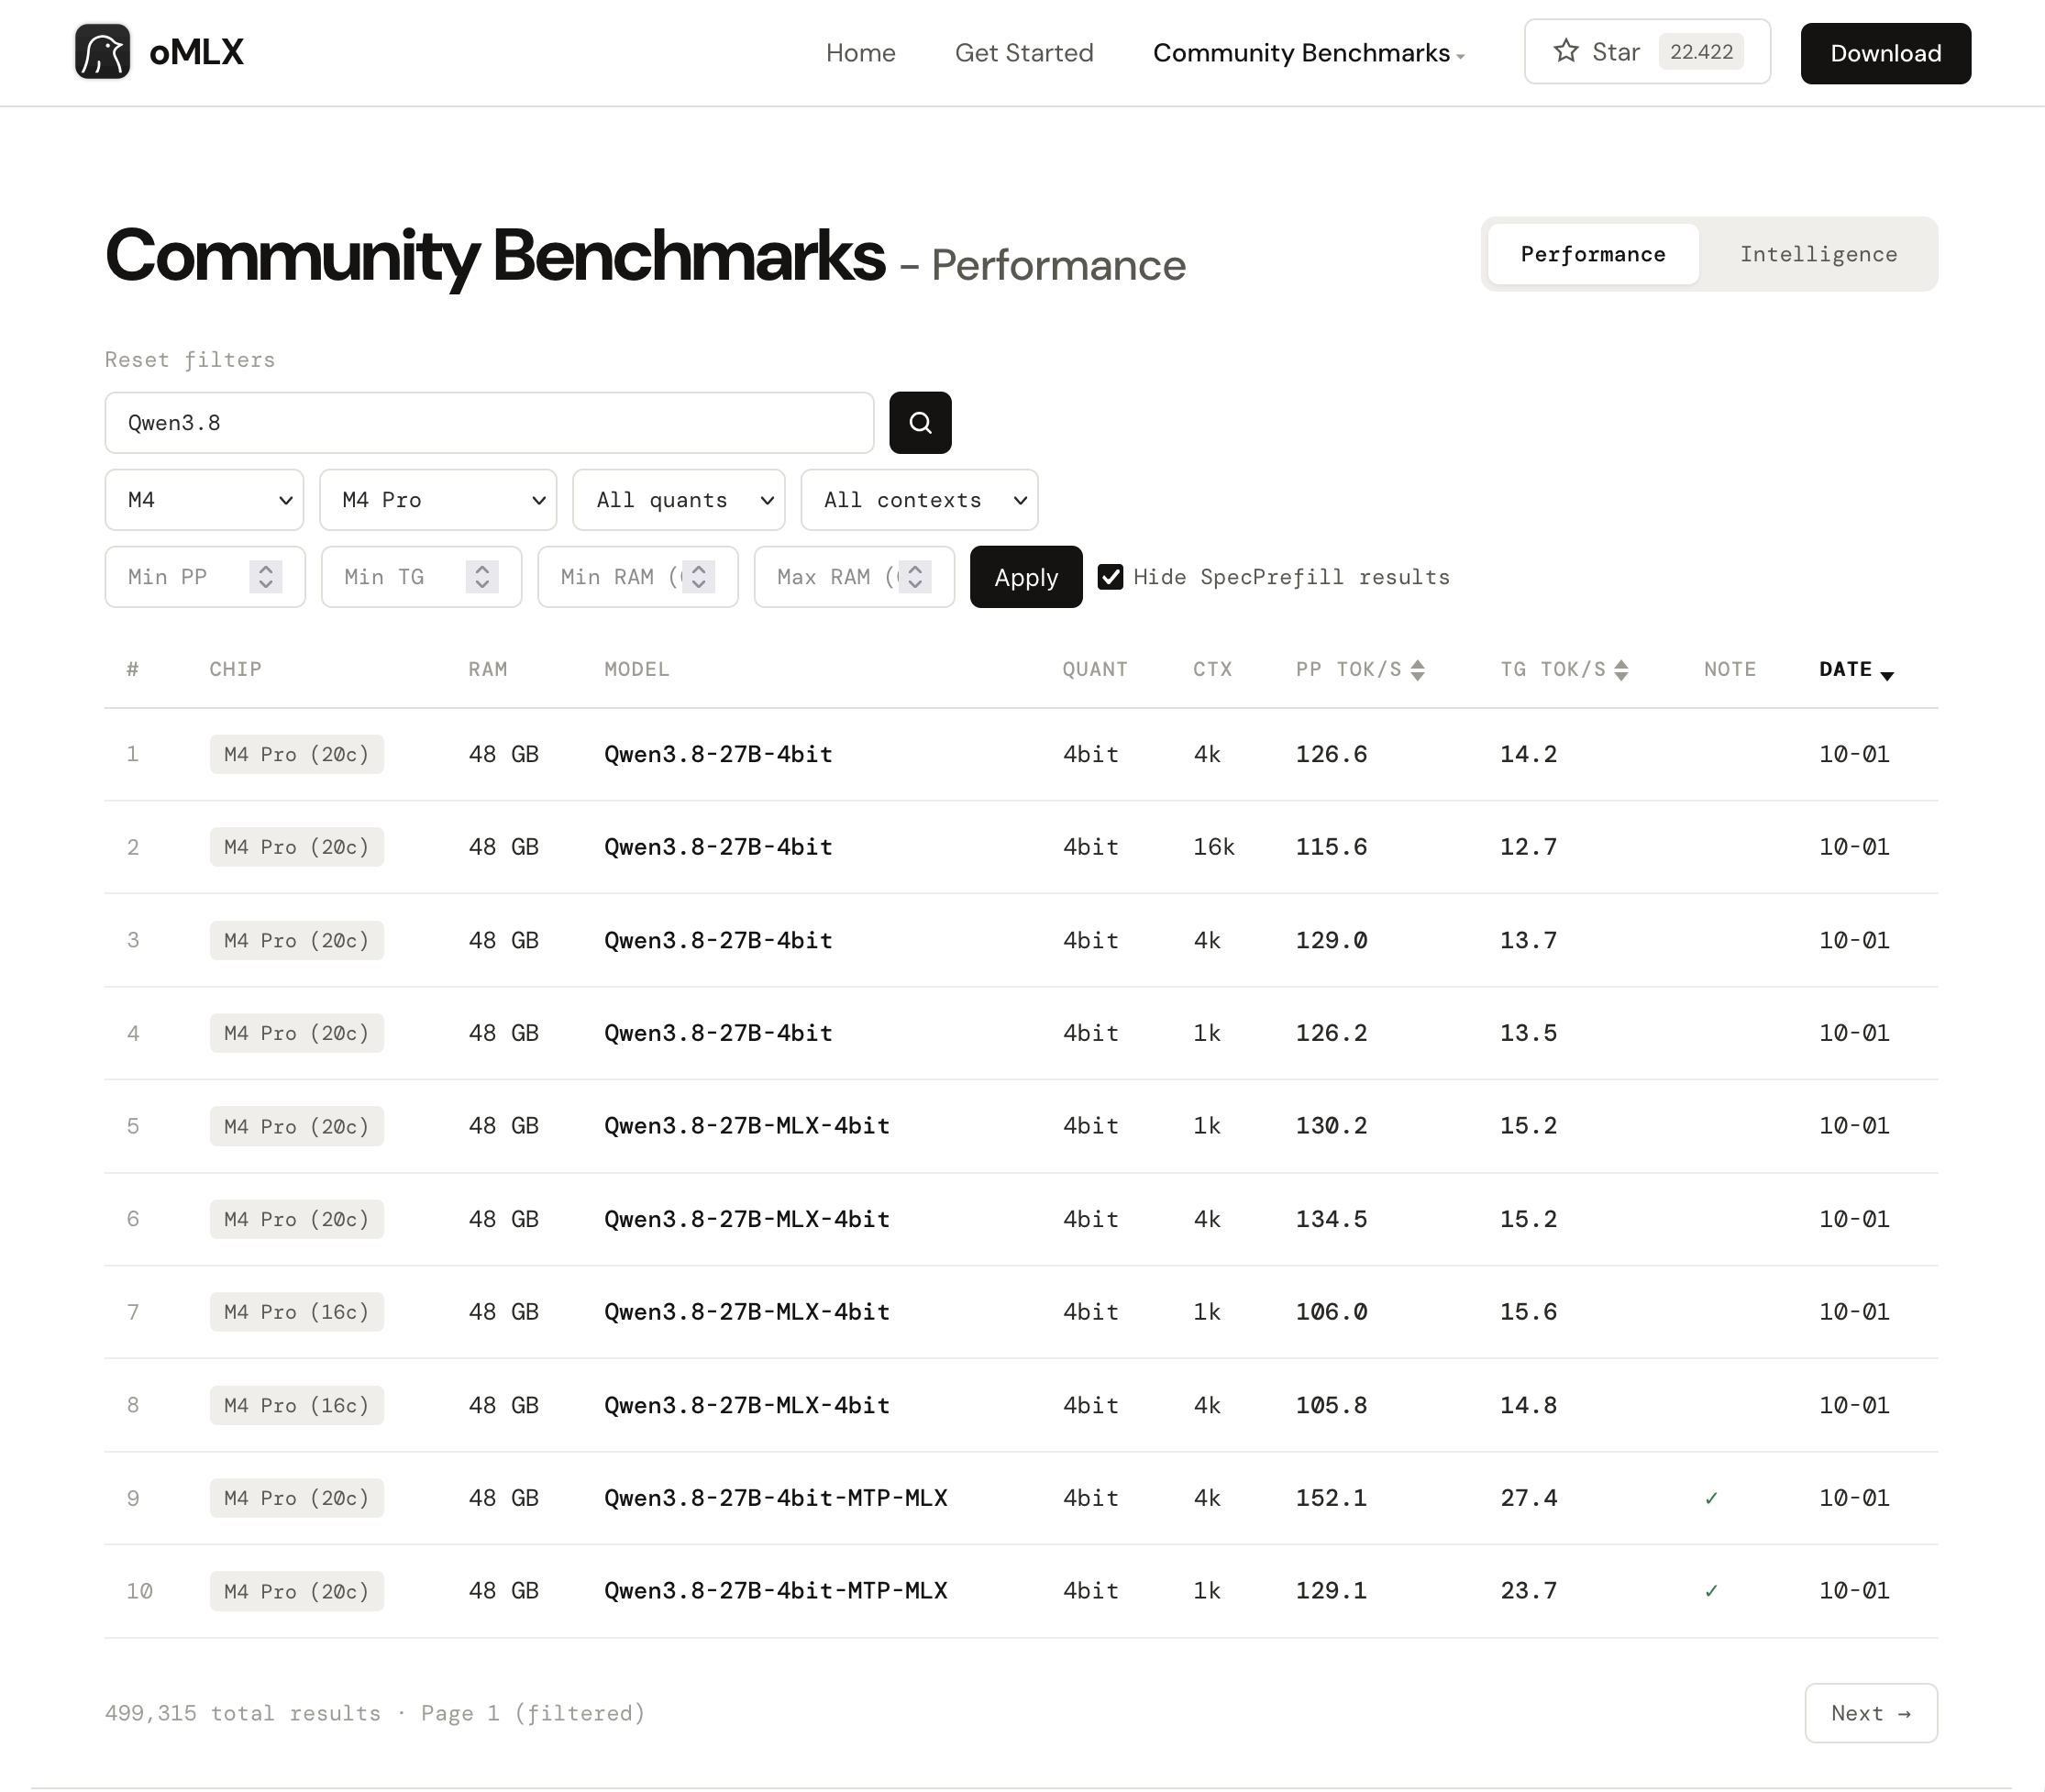
Benchmarking: oMLX includes built-in benchmarking tools that let you measure the performance and intelligence of different models and configurations on your hardware. This helps you make informed decisions about which models to use and how to optimize them for your specific setup. And it lets you share your benchmarks with the community to help others make better choices as well. Each benchmark includes the specific settings used, so you can replicate results accurately. This helps squeezing the most out of your hardware and ensures you’re getting the best performance possible. And it also helps if you’re interested in buying new hardware, as you can see how potential upgrades would impact performance before making a purchase. Try it for yourself!
JIT Model Loading: Just like with LM Studio I can load models on demand. This means most of the time I don’t even have to open the oMLX app to start working. I just start Open Code and give a prompt and the model I chose will load automatically in the background.
Shared model files: oMLX looks up models on disk downloaded by other tools such as LM Studio, Ollama, HuggingFace CLI, and more, allowing you to seamlessly use models across different platforms without redundant downloads. This out-of-the-box compatibility saves time and storage space, making it easier to manage your local AI models efficiently.
Quantizing: oMLX supports model quantization, so if you can’t find a specific quantization for a model, you can create it yourself. This allows you to optimize models for your specific hardware, balancing performance and memory usage according to your needs. It also allows you to keep the MTP head to benefit from faster token prediction even with quantized models. Most quantizations I find online miss the MTP head so creating your own ensures you don’t lose this advantage.
Edge Model Support: oMLX is optimized for running models at the edge, meaning you can leverage the newest models immediately on your local machine. For example, support for the Qwen4 architecture was released within days of its official announcement, allowing early adopters to experiment with cutting-edge models without having to use cloud-based solutions.
ANE Support: oMLX takes advantage of Apple’s Neural Engine (ANE) for accelerated model inference on supported Macs. This allows for faster processing and lower power consumption compared to relying solely on the CPU or GPU. By leveraging the ANE, oMLX can squeeze the most out of the modern chips like M4 and M5. On my system this boosted prompt processing from 120 to 130. It’s a small boost, but every bit helps when running large models locally.
Conclusion
What made me switch to oMLX wasn’t a single feature. It was the combination of stability, performance, and thoughtful design coming together. The overall experience felt polished and reliable, which made it easy to justify the switch.
oMLX is now my go-to choice for running large language models locally on Apple Silicon. It combines stability, performance, and thoughtful design, making it the most reliable option I’ve found for my workflow. If you tried oMLX early and gave up like I did, I’d say it’s worth revisiting. The project has matured in all the ways that matter. I no longer recommend LM Studio as the preferred local AI engine. oMLX has proven to be more stable, performant, and thoughtfully designed for the Mac ecosystem, making it my go-to choice for running large language models locally.
Is it perfect now? No, there were still some examples where the SSD caching lacked and my whole conversation had to be loaded again. But far less times than when I was using LM Studio or other tools. The memory management has improved significantly since I last used it. But it still seems to use more memory than LM Studio with the same models.
What’s Next
I ordered a Mac Studio and plan to run oMLX on it. The Mac Studio is a lot more powerful than my current setup, and I’m excited to see how it handles larger models and more demanding workloads. With the additional resources, I hope to finally be able to run Qwen3.8-27b at respectable speeds, and will also look into image generation with Qwen Image 2.1.